
When Monsteras are happy and thriving, they can grow big — really big. While that looks amazing, it can be a bit of a problem when the leaves and petioles start bending over.
To stop your Monstera from flopping, you’ll need to give it a stake or support!
Moss poles are one of the most common stakes for Monsteras, but you can also use a coir pole, trellis, or wooden board. Loosely tie the plant stem to the stake to keep the plant upright.
Make your Monstera the centrepiece of your indoor jungle with a good support for it to climb. Then sit back and watch the leaves go (or rather, grow) wild.
When to Stake a Monstera | Types of Stakes for Monsteras | How to Stake a Monstera | Treating Mould
Do I Need to Stake My Monstera Plants?
There are plenty of benefits to staking your Monstera!
Monsteras in the wild are natural climbers. As epiphytic plants, they have aerial roots on their stems, which attach to a support (like a tree) and allow the plant to grow upwards.
You probably don’t have a large rainforest tree at home, but you can mimic a Monstera’s natural growth habit by providing alternative supports for it to climb — think moss poles or trellises.
By staking Monsteras, you’ll often get larger leaves and more lush foliage. The stake also lets you control the direction and shape of your plant’s growth.
On the other hand, without a stake, you might start getting unruly or leggy growth. Large plants will also flop over from their weight, which could hinder growth or even lead to breaking.
When to Stake Your Monsteras
To let your Monstera thrive, it’s best to give it support once it has an established root system.
The earlier your plant gets a support pole, the better — not just for your Monstera, but for you, too! It’s more difficult to stake a mature Monstera than a juvenile one.
The vines of a mature plant may be twisted, leading to leaves that point in different directions. The roots are also more established, and it can be tricky to insert a support into the soil without disturbing them.
Still, it’s possible to stake an older Monstera. You just need to be more careful, especially with large plants like a full-grown Monstera deliciosa.
What Kind of Stake to Use For a Monstera?
There are several types of stakes that you can use to prop up your Monstera plants. Which one you choose depends on your preferred aesthetic and budget, and the plant’s size!
Whichever you choose, make sure the stake is at least the same height as the plant. You may need more than one stake for larger Monstera varieties.
Moss poles
Moss poles are among the most common supports people use, not just for Monsteras, but for other indoor plants.
Typically, moss poles are plastic tubes with gaps where the aerial roots can poke through. Some are structured and stackable, while others are made of folded clear plastic.
After assembly, the poles are filled with dampened sphagnum moss. The aerial roots then grow into the moss, attaching the plant to the support and taking up extra water or nutrients.
Moss poles are affordable and easy to stack, so they can “grow” with your Monstera as it gets taller. However, they must be kept damp, which requires consistent effort.
Moreover, the moist environment from watering or spraying the moss may increase the risk of root rot, stem rot, or mould.
TIP: If you’re worried about mould, you can use the poles without moss inside!
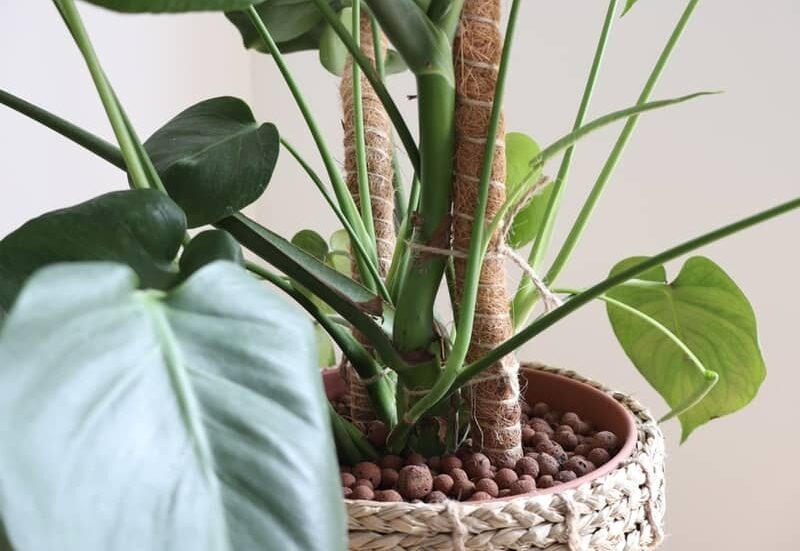
Coir poles
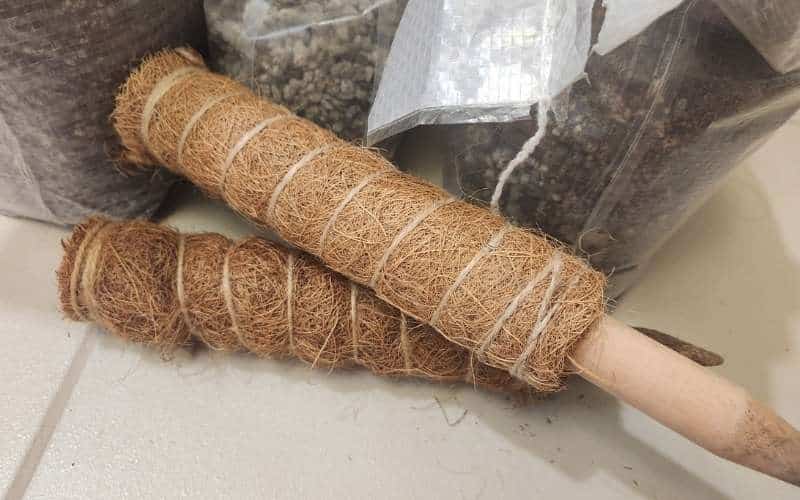
Coir poles are another affordable Monstera support pole. They’re typically made with coconut coir, with a stackable design.
These poles are usually more low-maintenance, since you don’t need to keep them moist, unlike moss. That’s because it’s more difficult to get roots to grow into coir.
Instead, indoor gardeners prefer to keep them dry and use jute string or other ties to secure the plant.
That then makes it easier to repot your Monstera since you can detach the plant from the poles, then reattach it inside the new pot.
The poles are fairly heavy, though, and can tip over your plant if not properly inserted. They can even damage your Monstera if it doesn’t have a strong root system to keep it in the pot.
Trellises
If you have multiple Monstera plants in one pot, or want that vining aesthetic, a trellis is a good option. The vines can be trained to climb upwards by clinging or twining around the thin posts.
It’s also easy to extend a trellis as your plant grows, though you’ll need to make sure it fits inside the pot.
On the other hand, they’re not very suitable for large or single-stem Monsteras, since you’ll end up with leaning or drooping petioles. A trellis might also be too flimsy to keep your plant upright!
Wooden board
Want a cheap and easy support for a Monstera? Try a wooden board or plank!
Wooden boards are convenient since you can cut them to fit both the plant and the pot. They’re also more sustainable than sphagnum moss or coir.
Moreover, the aerial roots attach pretty easily in good humidity (at least 50%) — just like they would cling to a tree in the wild.
There are downsides, though. Wooden planks can rot if not treated, and they’re not as sturdy or easy to extend. They also make repotting trickier.
Bamboo sticks

For small plants — like a newly-potted Monstera propagation — a bamboo cane or stick works in a pinch!
The canes are cheap and widely available, and they’re easy to set up. You can even combine several sticks to form a DIY frame or trellis.
However, they’re quite flimsy, so they’re not recommended for mature Monsteras. The sticks are also less visually attractive, especially since you’ll need garden ties to attach the stems.
Steps to Stake Your Monstera

Staking Monstera plants lets them grow tall, healthy, and happy.
Gather your supplies beforehand, including:
- Handheld trowel or shovel
- Preferred stakes (e.g. poles)
- Plant ties (e.g. gardening Velcro)
- Additional potting mix (if needed)
Work on a flat surface covered with a gardening tarp or mat to catch any dirt.
1. Prepare the pot and stakes
For a moss pole, you’ll need to prep it beforehand. Fill the pole with sphagnum moss, then let it soak in water for a few minutes to dampen the moss.
(TIP — add a little water-soluble fertiliser to the water to give those aerial roots some food!)
If you’re upsizing to a new pot, be sure there’s enough space for both the plant and the new support. Fill the bottom 1/3 of the container with fresh potting mix.
However, if you’re inserting the stake into the current pot, you’ll need to make some room. Use your hands or a handheld shovel to dig a hole in the soil at the base of the Monstera, taking care not to disturb the roots.
Make sure you dig deep enough that the support will sit in the soil without wiggling or falling over.
2. Insert the stake
For a new pot, insert the stake before you transfer the Monstera into its new container. Position the support closer to the back of the pot and hold it in place while you place the plant’s root ball alongside it.
Otherwise, carefully insert the stake into the hole (or holes) in the soil. Again, be mindful of your Monstera’s roots!
Backfill any gaps with more potting mix to hold the support in place. Give the pot a little shimmy to settle the soil, then use your fingers to (gently!) firm the area around the stake.
3. Attach the plant to the support
Once the support is in place — and you’re sure it’s not wobbling — it’s time to attach the Monstera!
For moss poles, some shops will sell them with accompanying plastic clips. These have one end that attaches to the pole, while the other end secures the plant stem.
For other supports, you can use things like:
- Jute string
- Soft garden ties
- Gardener’s Velcro
Hold the stem loosely against the support. Count 1–2 leaf nodes from the base of the Monstera, and add the first tie there.
Always secure the plant by the stem — never the leaves or petioles. Tie the Monstera between leaf nodes and don’t wrap too tightly!
Repeat every few leaf nodes, but stop a few centimetres from the end of the stem. As you make your way upwards, ensure the aerial roots point towards the stake, while the leaves are angled outward.
Avoid twining a stem around a pole, as that isn’t the plant’s natural behaviour. However, you can weave the Monstera vine through a trellis to train it to climb up.
Do your best to point the foliage in the same direction. If the leaves point in different directions, it’s harder to make sure they all get enough light!
4. Set up the plant
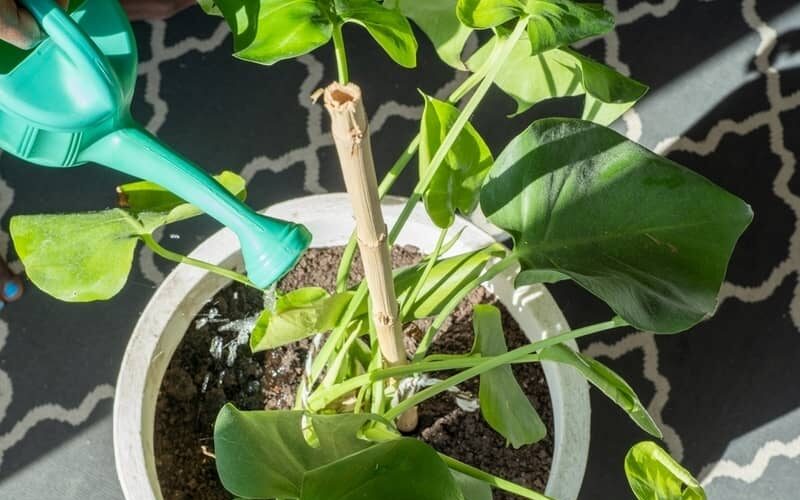
Once you’ve finished settling the support in the soil, water the plant well. This helps minimise the risk of shock to the roots.
Return your Monstera to its original spot in your home. Angle the leaves towards the light source — either a window with bright, indirect sunshine or a full-spectrum grow light.
You can rotate your plant a quarter turn every few weeks to ensure even exposure to the light. Turn it to one side first, then the other.
Look out for signs of shock, such as yellowing Monstera foliage. Don’t pull off the wilted leaves, since they’re still a source of nutrients! Instead, wait for them to fall off naturally.
Care for your Monstera as usual. For moss poles, lightly mist them when the moss starts drying out so the aerial roots can attach more readily.
Monstera Moss Pole is Growing Mould — Help!
Both moss poles and coir poles are vulnerable to mould, especially if you live in a hot, humid climate. Look out for fuzzy white or grey growth on the surface of the pole.
If the growth is green and slimy, that’s not mould — that’s algae! It’s mostly harmless and appears on damp moss that’s exposed to sunlight.
The mould isn’t necessarily harmful to your Monstera, either. But it’s often a sign of other issues, such as overwatering, low light, or poor air circulation.
You can treat the mould by spraying it with a mix of either:
- 1 part rubbing alcohol to 20 parts water
- 1 part hydrogen peroxide to 4 parts water
Avoid getting your chosen solution on the leaves and petioles. However, it won’t harm the aerial roots in small doses.
Afterwards, ensure your Monstera is getting enough air circulation and sunlight.
If you notice the mould keeps recurring, though, it may be better to use a different type of support. Check for other moisture-related issues as well, such as root rot.
FAQs About Staking Monstera Plants
We’ll address a few other questions people have about staking their Monsteras.
What is the best way to stake a Monstera?
There’s no strict “best” stake to use for Monsteras, but many people prefer moss poles!
Since moss poles encourage Monsteras to grow their aerial roots into the damp moss, the plant gets additional nutrients and water. That often leads to bigger, more lush foliage.
However, moss poles need consistent moisture or the material dries out. If you prefer a more low-maintenance option, don’t worry — your plant will still be happy.
Can I grow my Monstera without a support?
You can, but the Monstera usually ends up looking leggy or unruly.
Without support, the stems will flop over and trail out of the pot. Over time, you’ll get larger gaps between the leaves and smaller foliage.
Why is my Monstera tipping over?
If your Monstera is falling over despite having stakes, it’s unbalanced! This usually means the plant is too top-heavy or the soil isn’t holding the stake in place.
Make sure the pot contains enough soil to secure the plant and its stake. If not, you may need to add more soil to hold the stake or size up the pot.
For larger plants, it might be better to prune your Monstera or even divide it into several smaller plants.
One other reason is that your Monstera isn’t secured properly to the stake. The ties should be tight enough to hold the stem against the stake, but not so tight that they dig into the plant.